Power amplifiers from the 1970s-1990s were typically designed for high-current and continuous watts. With class A/B or Class A circuits the expectation was to drive difficult speaker loads at high volumes without running out of steam. Due to the simple, modular design and low price the Hafler DH-500 quickly became popular in the audiophile community. It was also very popular with bands and nightclubs due to its clarity and seemingly endless power reserves. Sold in both kit and factory-wired versions the amp was rated at 255 watts per channel into 8 ohms. In 1981 the audio magazine Stereo Review bench-tested one for an article and recorded it clipping at 434 watts into 8 ohms. Dynamic output was 792 watts into 4 ohms and 653 watts into 2 ohms. Not too shabby!
I decided a great project would be to resurrect a stock DH500 by upgrading its circuit and power supply to modern-day standards. Online I found one built about 1983. It had seen better days and looked like it had seen some serious band use. One power supply cap had been replaced and one Hitachi mosfet was said to be out-of-spec. The case looked like it had been dropped down a flight of stairs but it powered right up.
 |
It was filthy inside and the fan was clogged with years of dust. The wiring was messy, it looked like a kit version. The boards evoke a 1980s feel.
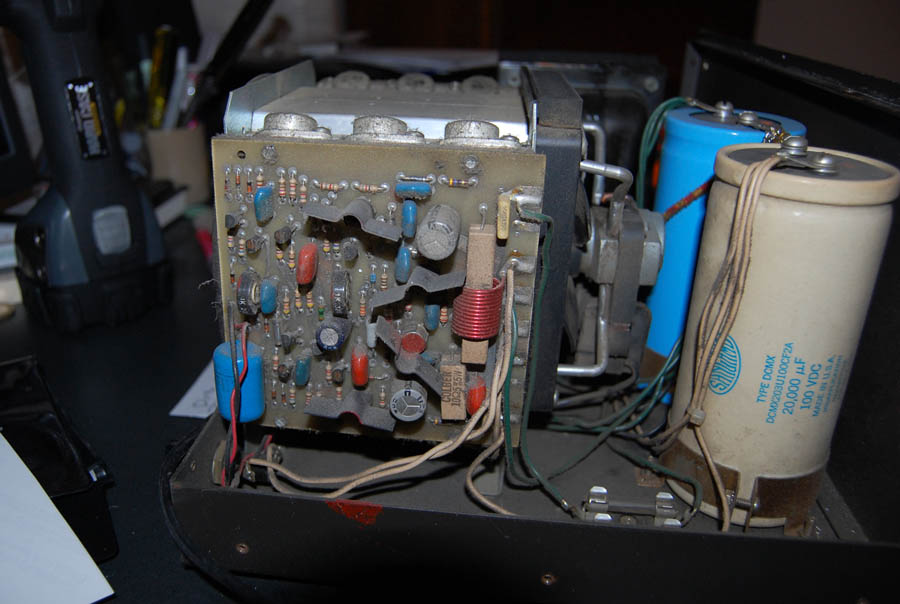 |
Originally I planned on simply cleaning up the unit and adding Musical Concepts boards. I had used their mods on several pieces of equipment in the past and found them to be far superior to the original circuits. The photo below is in the process of rewiring and adding a pair of new 39,000uf caps. But after putting everything back together I found that the channel with the bad mosfet wouldn't bias properly. Since replacement Hitachi mosfets are long gone I wondered what to do.
Luckily Exicon made quality high power mosfets for audio amplifiers which were drop-ins for the DH500/XL600...the EC10N20 and EC10P20. Advertised with less "thermally related distortion" than the original Hitachi mosfets I bought a matched set of 12 from Musical Concepts and put them in myself with new mosfet sockets and new PA-3 boards. I also sourced a new Oslo high current power switch and completely removed the DC-offset relay circuit. At this point pretty much the only original items were the transformer and fan assembly.
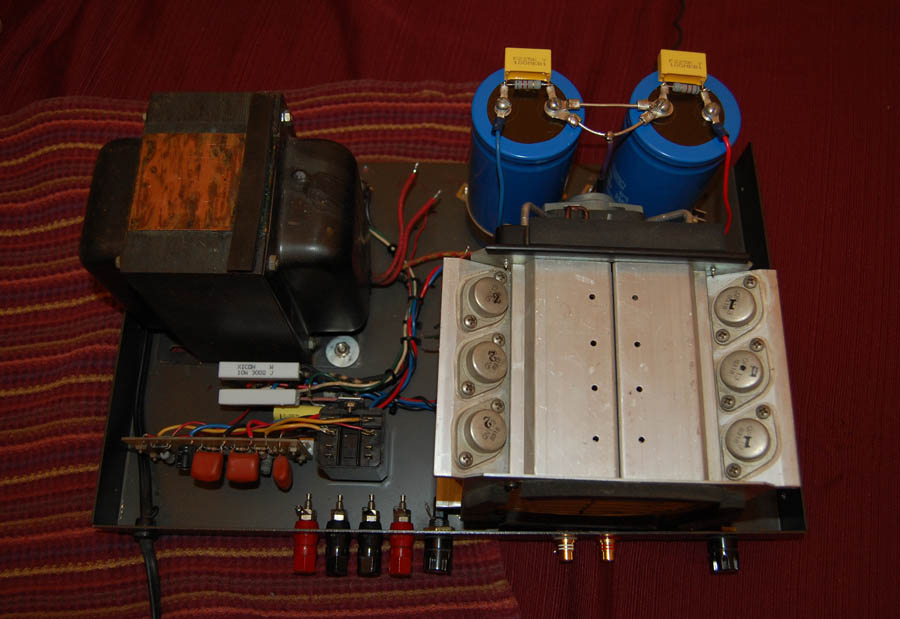 |
BELOW: New Exicon mosfets, PA-3 boards with Blackgates, and a power supply with four 39,000uf 100V caps. The sound? The Exicons were detailed and clean and the power supply was dynamic with excellent bass impact. I was happy.
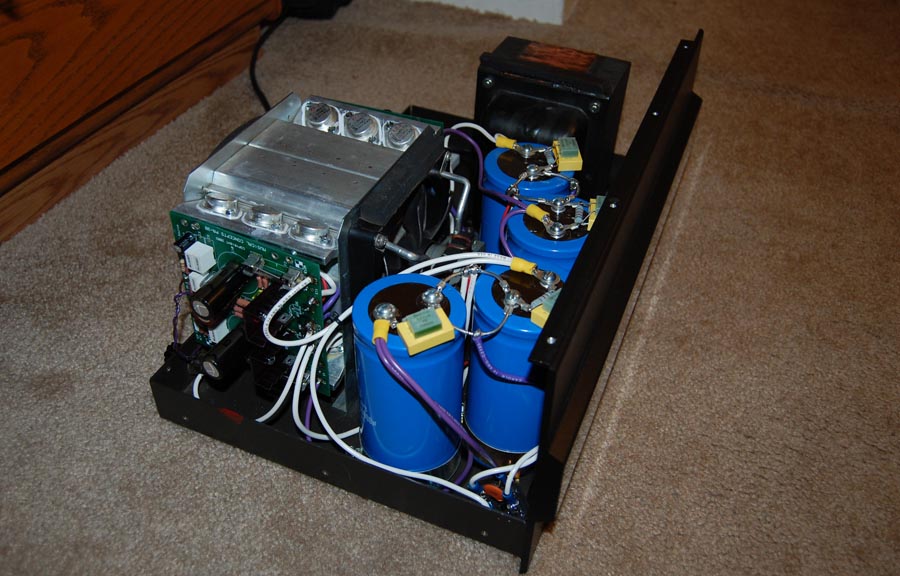 |
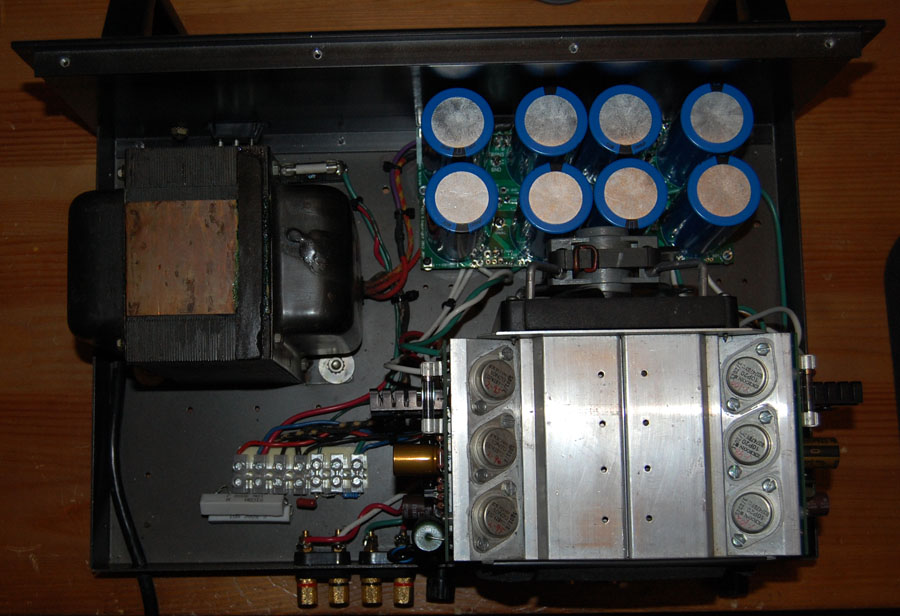
But in 2014 I got the upgrade fever again and decided I didn't like the rats-nest of wiring in the power supply. I replaced it with a pair of Musical Concepts PS-200 boards and eight Cornell Dubilier 383LX 12,000uf 100V caps. These were wired so the front PS-200 supplied one channel and the rear board the other, creating a pseudo dual-mono power supply. Two IXYS 600V rectifiers were used along with a set of Musical Concepts PA-4 'Standard' boards. The amp sounded excellent at this point. Spacious and dynamic, with a pure and accurate soundstage.
 |
WIRING
I don't believe speaker wire needs a boutique pedigree (I use generic OFC 12 gauge). But I do believe that preamp-level signals are highly sensitive to the quality of objects they pass through. While turning up the volume on a preamp creates a line signal of several volts, hall ambiance and spatial clues are vanishingly small at just a few millivolts or even microvolts. The point being is that these subtle signals can easily get lost in the noise floor or blurred when passing through poor quality materials. As a result there are two locations in the 500 I use superior quality wire: the input wires from the RCAs to the board, and the board to the gate resistors. No mysticism here, I use Mogami W2549 cable specifically designed for low level pre-amp signals. With OFC and extremely low capacitance I find it very satisfying to use in a signal path. My trick is to buy a bulk length and slice the jacket open with a razor blade to extract superior quality hookup wire.
It goes without saying that the rest of the 30+ year old 18g wire inside should be replaced too. An interesting view is rather than seeing an amp as the last electrical item in a chain, that a foot of internal wire doesn't matter, its actually the opposite. The first thing the amp "sees" on its route out to the wall socket is its internal wiring. And rather than sitting at the end of a 120V wire its actually sitting between the building's AC rails. The original power plug did not have a Hot and Neutral blade. So when I replaced the power cord with a new heavy gauge version I connected the Hot wire to the power switch, Neutral to the fuse holder. I replaced all the voltage-level wiring with quality stranded 16g and changed the ancient terminal strip to a Molex "euro-style" version.
Little noticed is a twisted-pair of wires that run from the terminal strip to the bottom of the fan assembly. If you flip the fan module over you'll see it passes through the inrush limiter (thyrister) and two thermal breakers. This means one rail of 120V entering the amp loops under the fan module and back out before getting to the transformer. I replaced it with 16g and found it added noticible clarity and solidity to the sound at higher volumes.
FAN
I removed the fan by taking out the two rear housing screws and four cage screws. The #6x32 housing threads were out of round and tight so I used a tap to clean them out and replaced the factory screws with two stainless allen-head bolts. I lubed the bearing with silicone and made sure not to lose the thin thrust washers on the shaft (mine had 4). When tightening everything back up I spun the fan by hand while wiggling to align the shaft. The result was a whisper quiet fan that spins easily.
THE TRANSFORMER
Late Rockford transformer bells came in a nice graphite finish. Early Hafler versions like mine have a rough, industrial look I don't
like. While I could have swapped it out for a pair of toroidal transformers I decided to restore it. Each bell has a small hole at the bottom and it looks like the factory inverted the transformers and completely filled them with epoxy which is standard practice to minimize noise from the windings. The bell bolts are an unusual size: about #8x32 by 3 1/4" inch long which I couldn't find anywhere. So I bought a #8x32 threaded rod, cut four short lengths, and added KEP nuts on each end. I painted the bells with semi-gloss enamel.
NOTE: I was puzzled by an odd blob on one bell (in photo above) that I've seen on every early 500. I removed the blob and found nothing underneath. I suspect its simply a drip that puddles under the inverted transformer after its epoxy-filled at the factory. Messy Hafler.
GATE RESISTORS
A mosfet has three terminals: In (source), Out (drain), and one called the GATE. The circuit board sends drive voltage (the music signal) to the gate which triggers the current flow from source to drain, sending audio to the speakers. The issue is MOSFETS are sensitive to rogue frequencies in the range of 50MHz to 250MHz. These can cause ringing, RF noise, switching losses, and uncontrolled, heavy oscillation. The widespread solution is to put a resistor just before the gate (called of course a gate resistor) to buffer the signal and aid stability.
I had forgotten that my mono XL280 (my home theater center channel) still had the 1988 carbon film gate resistors from the factory. So on a whim I swapped out the four gate resistors behind the boards (220 and 470 ohms) with Takman REY 1/2 watt versions. Watching a movie that night I was surprised that syllables and sibilants were much clearer. On my favorite demo movies I found dialogue more intelligible, dynamic, and with increased soundstage. It really was a significant increase in sound quality, unexpected and very satisfying. Common sense is that these "mosfet trigger" resistors should be transparent, quiet, and as musically responsive as possible. I liked the Takmans but I decided on Dale CMF RN55s which are advertised with exceptionally low noise averaging 0.10 μV.
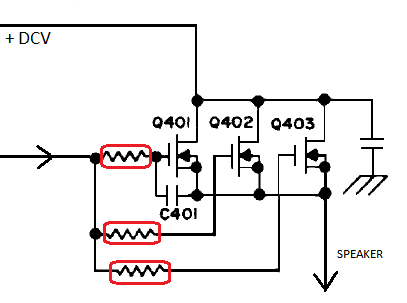 |
An Exicon white-paper recommends placing gate resistors “as near to the gate connection as possible to provide maximum damping.”
It has also been suggested that Exicons are most stable with gate resistor leads 4-5mm in length. I wanted to test this out but I wanted to avoid soldering longer leads on the resistors to lengthen the reach. So I bought a wider lug-strip to narrow the gap.
When I originally installed Exicons with my PA6s a trusted source recommended a 47pf cap across the N-channel gate-drain and a 22pf on the P-channel gate-drain, with one on each Exicon to optimize stability. While micas are great I wanted to use less expensive ceramic caps. A tip for ceramics is to use COG/NPO types which are ultra-stable and very resistant to temperature changes. My final result was an optimized circuit with 1% Dale CMF low noise gate resistors and a 2% Kemet Goldmax 300 ceramic on each mosfet.
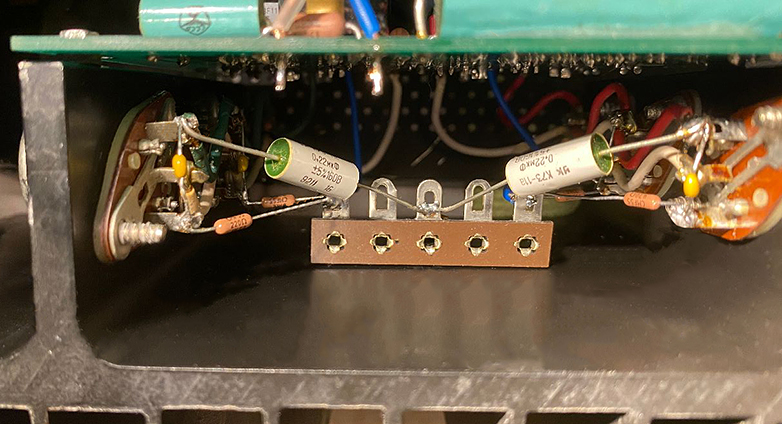
BELOW: XL-280 with 10P20 and 10N20 Exicons, shortened gate resistors, and COG ceramics.
 |
In the Spring of 2021 I decided to upgrade the power supply once again. Using two PS200s with 8 paralleled caps had performed well. But I didn't like the under-board wiring and wanted to reduce inductance, simplify the circuit and shorten the power traces as much as possible. I installed a PS500V2B and four CDE 382LX 22,000uf 100V caps. I wanted to use 383LXs which have slightly higher ripple current and blue jackets. But 383LXs in this size were not stocked by anyone so I went with the black jacket 382LX. With two IXYS rectifiers I get about 93V on each rail which is expected and satisfying.
 |
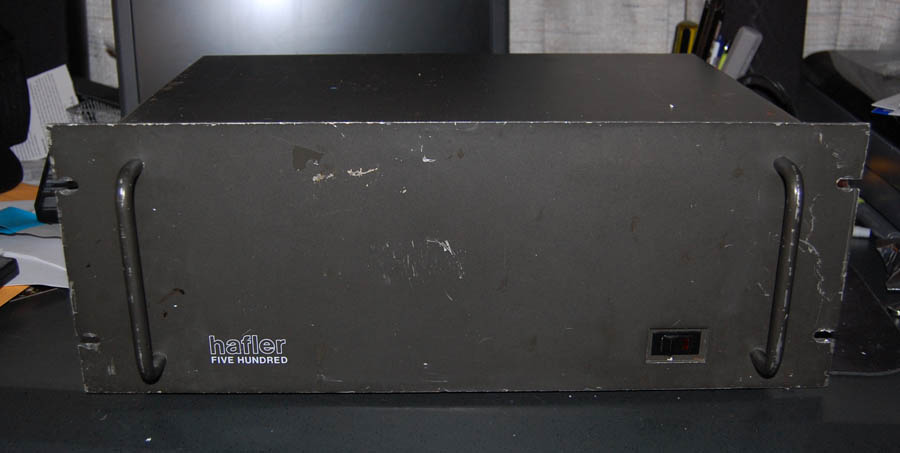
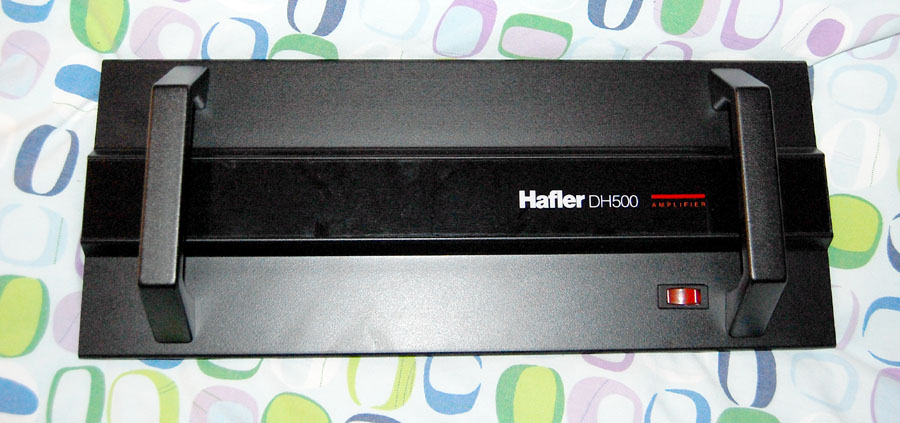
As a final touch I sourced a sculpted DH-500 faceplate which Rockford used to replace the olive-colored Hafler version around 1990. I also sourced a pair of XL600 handles which after measuring and drilling made for a great pseudo-XL600 front panel. This lets me use this in a rack with two XL280s to create a matched look for my 5.1 home theater.
CONCLUSION: Instead of an old-school circuit designed for analog sources, with obsolete, sluggish caps and resistors I have an audiophile's dream: a 40 year old amp with tight-tolerance audio-grade parts, Exicons, a very robust power supply, and close to 300 watts per channel of ultra-musical clarity and punch. The sound is clear as a bell at the highest volumes and the dead-quiet soundstage produces pinpoint imaging. Very fun stuff.
 |
Datsunzgarage.us © 1997-2024
All mods are illustrative only, perform at your own risk.
Datsun is a registered trademark of Nissan©